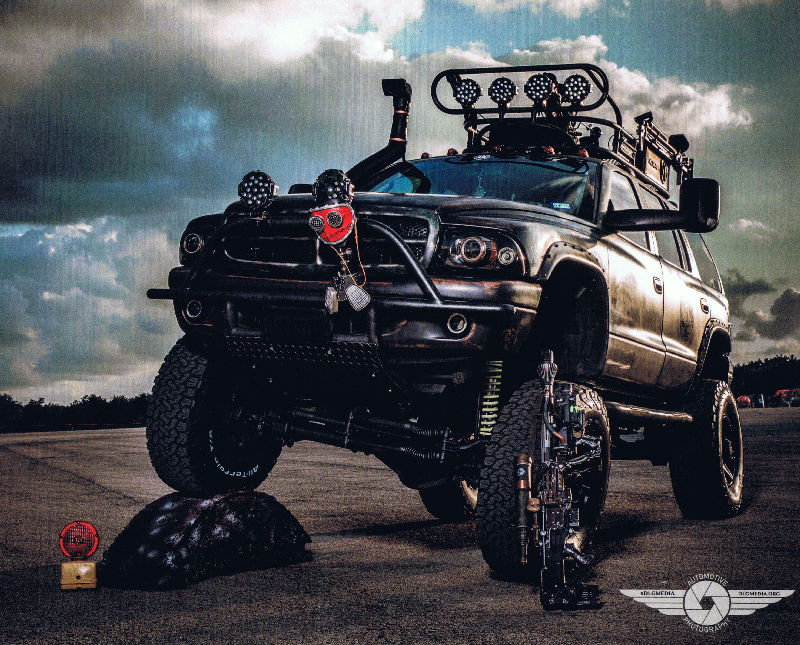
1998 DODGE DURANGO

4X4

5.9

Pearl White with Silver Flake
Flames are Pearl with Red Flake

I have a Prestige Platinum Alarm installed. It has the remote start and a pager. I also had the glass sensor installed with it. Red LED flashing lights are installed in the headlight assembly and come on when key is turned off.
The install was done by Dominic, the owner of Elite Sound and Security, Inc at 2437 Palmer HWY, Texas City, Texas.

I have the Superchip Tuner 3715 set for gas milage and dialed in the correct tire size so the speedometer would read correctly. I'm getting 14 MPG which is good considering the lift and tire with the 5.9 engine.

Engine Mods

4x4 Transfer Case Shifter

I installed the TM80 Magnum horns. I picked up the black ones to combat rust. They were basically plug and play.
All I had to do is cut the clips for the old horns, add new clips and plug them in. They mounted using the same mounts the original horns were on.

I have also installed a set of the Chrome 3D Tail lights

I have also installed what we call Dumbo Mirrors. They are larger than the Sport Mirror set up and are folding.
They came mostly on the Ram Trucks. Do not buy the Kool Vue brand as they are junk. I went through 2 sets and leanred the hard way.
Invest in the OEM ones and it will be well worth it. I paid $98 a piece for them.

I just added these headlights. They are New Genration Angel Eyes and are two times brighter.
They have the Cold Cathode Flourescent Lights in them. They light up the road like a stadium. Plus the row of small lights are the LED turn signals.


I have a 15" Black Chrome Antenna


Bottom pic is not my dash, but it is a great pic of what it looks like at night

I installed the Nu Image Flaming Gauge kit.
I also layed a brushed aluminum bezel over the gauges.

Click here to see where to purchase Flame Gauges.

Speedhut is where the Bezel overlay was purchased.


Before Pics........................................After Pics

Installed a 3" body lift. It took me about 6 hours by myself. I did have some help when it came time to lift the body while putting the blocks in place.

I purchased the body lift from Central4wd.com for 185.00.

I have blue LED lighting under the dash to light up both driver and passenger floorboards and on the ouotside of the truck under each front door.

I have finished the install of a stereo system in my D. I found out real quick that the D is for people room only as there is no space for anything else.

This is a list of the Stereo equipment installed:

Backup Camera Install

2008 Kenwood CD Receiver KDC-BT83U HD with remote
My iPhone 3G is also Bluetoothed to the radio. So all I have to do is tell my radio to make a phone call and it will.
When someone calls me, the radio shuts off and starts ringing. Then
I talk through the mic on the steering coloumn and listen through the front speakers. As soon as
the call is disconnected, the radio comes back on. The radio will also display text messages on the screen and who they are from.
It also downloads my phonebook everytime the two sync up. Also the iPhone will hook up to the radio via the USB port for the iPod nano below. Now my wife wants the iPod for herself,
but I cannot see myself separating the Nano from the radio since I did the install below. HAHA!

iPod Nano hooked directly into the radio via the USB cable.
Click the above link to see this mod/install.

Phoenix Gold EQ 215x with bass gain remote

Lanzar Vibe 435, 4 channel, 1600 watt, viberant amp

StreetWire distribution block and grounding block with StreetWire wires throughout

2 Kicker 15" XPL speakers

I installed Kenwoods all the way around in doors.

I just installed Memphis 4 1/2" 2 way coaxials in each kicker panal for the Cell Phone part of the radio. With the mic mounted on the steering column and the two new speakers, I talk and listen through that part of the system for my Cell, making it all handsfree. I have also set it up to voice commands. I just tell the radio who to call and it does the rest.
For those of you going this route, you will need to wire two front speakers to the pig tail coming out of your Kenwood if you are using RCA Cables on the rear output to an amp.
The Bluetooth Cell part for listening ONLY works through the front speakers through that pig tail and NOT through the RCA Cables.

It took me about 2 weeks to build and install the system.


Front of sub box with red arrow showing
porthole for wires

Sealed box where wires run to amp for concealment from view

Back view of sub box showing hole where wires come out and run to amp. This way all wires running to amp are out of view.

Sub box after I covered it with gray carpet to match interior

I installed the EQ inside the middle fold down seat back

This is with the cover panel I made and covered with black vinyl. All wires ran inside seat and down under carpet


Arrows point to bass control knob I installed in overhead

Arrows pointing to where wires will run into amp enclosure

After putting on enclosure. This enclosure is pressure fitted in place

Completed rear view of sub box. Arrows point to where distribution block is mounted and where wires run into box for amp

Front of sub box showing 2 Kicker XPL 15's. Due to limited space box is not built to specs. Though bass sounds tight it is clean

This is how I ride, with rear seat down. If enough people ride with me I can put rear seat up. Note EQ mounted in middle seat back. It can be up or down. If the four year old rides in here, I will definitly keep it up!

2008 Kenwoood CD Reciever KDC BT83U HD

Here is where I ran my hot wire. Red arrows point to bracket that holds Flextite and also to the front inline fuse. It is safe to have an inline fuse at the front and rear of D in case of a short occuring anywhere along hot wire. *See below for full description


Here is where the hot wire is running underneath the D

The arrows show where it runs through the floor into the D


Here is the Flextite I used to run the 4 gauge hot wire under truck.
*see below


This is where to hot wire enters the truck under the rear seat. The red arrows show where I grounded the system using the rear bolt on the seat bracket.

I have since moved the ground wire from the rear seat bolt down to the frame. I was getting some noise that was intermitent throughout system. Turn signal noise in speakers ect..
After grounding to frame all noise ceased.

*I ran my hot wire down underneath the truck. First I ran it through a Metallic Liquid-Tight Flexible Conduit. It takes 2 kits to complete as it is a long run from the engine compartment to where I entered the cab area. You can locate the connector to use that connects the 2 Flextites together in the same area that the Flextite kits are located. I got my kits at Lowes. They are used for running the electrical wires from an outside central air unit to the house. With the metal lining in the conduit, it protects the 4 gauge hot wire. The conduit is also good to use on the 4 guage grounding wire, if you opt to run the ground from your grounding block to the frame. I used to compete in the USAC stereo competitions with another truck and this method got me a lot of points. The 4 guage wire is perfect for running through the Flextite, though it can be a job sometimes.


The D now has 8 1/2" of lift with 35" Mickey Thompson on 20" XD 798 Series.


See Paint details HERE

I installed a Keystone Spoiler. Click HERE to see the install.
It was very easy to do, but you really need two people to do it. I raised my hatch up and since my struts need replacing, I could set the hatch to where to spoiler rested on it.

I did the Rear Wiper Conversion Mod. It involves changing the Gen1 rear wiper assembly out for the Gen2 Assembly.
CLICK to see how it is done.

The Bumper Guard Build

Replaced all Dome Lights with High Powered LED's and all lights can be found at SuperBrightLEDs

Front two bulbs are WLED-xHP5 and are the White LEDs.

Center bulb over the second row of seats is the 4210xHP6 in the Cool White

The rear bulb located in the back hatch is the RL4410-xHP9 in the Cool White

You will not be disappointed in these bulbs. They are High Powered and light up the D so much better than the stock bulbs and look so much better than the yellow of the stock bulbs. Just remember that when the LEDs come in, they are the light only.
You have to use the stock plastic base on the front two dome lights. Just pull the old bulbs out of the plastic base and insert the new LED.

Here is the front Dome with the LED on the right and the stock on the left.

The 2003 Axle Swap

Rear Differential Guard

Driver Seat "Rocking Chair" Fix


Powered by counter.bloke.com